How to Install Custom Fonts on iOS 13 and iPadOS 13
 |
| How to Install Custom Fonts on iOS 13 and iPadOS 13 |
Of late, we are seeing Apple is slowly slacking its strict control over customization features on both iPhone and iPad. From dark mode to widgets support on iPad, Apple seems to be listening to its customers and that is simply great. On similar lines, Apple has also brought support for custom fonts with the release of iOS 13 and iPadOS 13. Yes, that is right. Now, you can install custom fonts on your Apple device without having to tinker or jail-break your device. So, in this article, we bring you a step by step guide to install custom fonts on iOS 13 and iPadOS 13. With that said, let’s begin.
Install Custom Fonts on iOS 13 and iPadOS 13
Before we start, let me explain how custom fonts work on iOS 13 and iPadOS 13. Also, how different it’s from iOS 12 in terms of execution and ease of use. First of all, to use custom fonts on iOS 12, you had to allow something called a “Profile” which is basically a configuration file deployed by the developer to control various aspects of the app. However, Profiles could also be used to inject malware or steal data from your device. In simple terms, Profile was a workaround to use custom fonts on iOS 12 and came with its fair share of problems.
With native support of custom fonts on iOS 13 and iPadOS 13, you no longer need to tinker with various settings. All you have to do is download a font app from the App Store and install it on your device just like any other app. In case, you encounter any app which asks you to allow a Profile, assume that it’s an old method and the app is not using the new custom font feature available on iOS 13 and iPadOS 13. Now having said that here we will show you how to install a custom font app on your iPhone and iPad without using Profile or any hacks.
Steps to Install Custom Fonts on iOS 13 and iPadOS 13
1. Open App Store and simply search for “fonts”. You will find a lot of apps, but I would recommend the Font Diner app (Download) as it’s using the native custom font feature. Also, the app is completely free.
2. Install the app and open it. You will find an “Activate Now” button on top. Tap on it and select “Install”. That’s it. You have successfully installed 23 new fonts on your device.
4. You can find the installed fonts from Settings as well. Just navigate to Settings -> General -> Fonts and tap on the fonts to find their typography design.
Steps to Use Custom Fonts
Currently, custom fonts are only available in select few apps such as Mail, Pages, Numbers, and Keynote. So, if you want to write an email or create a document then you can do so easily without any hacks. Apple is allowing custom fonts mostly on creative and work apps as of now. However, with the release of Photoshop and other creative apps on iPadOS, we will see better custom font support across third-party apps. Here is how you can use custom fonts on iOS 13 and iPadOS 13 right now.
1. Open any of the supported apps (Mail, Pages, Numbers, and Keynote) and tap on the “arrow” sign on the keyboard. After that, tap on “Aa” and a new format window will open up.
2. Here, tap on “Default font” and you will find the installed custom fonts on top. You will also get a list of native fonts already available on your iPhone or iPad. Now, you can simply select a font and start typing hassle-free.
Use Custom Fonts on Any App
If you want to use custom fonts on any app then you will have to use a font keyboard which is an entirely different app. It lets you type in various fonts and works flawlessly on Messages, WhatsApp, Instagram, and hosts of other messaging apps. However, the problem with font keyboards is that your recipient may not receive the same characters unless it’s supported by the native system. Also, keep in mind, with third-party keyboards, there is a possibility of data logging so there is that.
Nevertheless, in this section, we are going to use a paid app called Fonts which claims to not record any data. Also, it offers some free fonts along with the paid ones so you can give it a try before committing to a premium plan. Here is how you can use it.
1. Download the Fonts app (Free, in-app purchases) from the App Store and install it on your device. After that, open it and tap on “Continue”. It will ask you to subscribe to the paid plan, but try to go back and you will find a cross button on top. Tap on it.
2. Next, you will be taken to the Setup page. Here, tap on “Go to Settings” and open “Keyboards”. Now, enable the toggle for the “Fonts” keyboard.
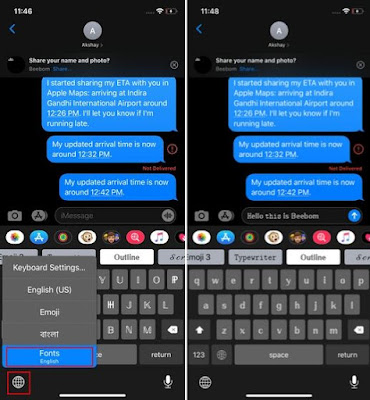
3. Now, open any messaging app and long-press the “globe” icon on the bottom-left. Here, choose “Fonts” and voila, you will get different fonts on your keyboard. Some fonts are free such as Typewriter and Outline. You can use the font keyboard extensively and see if it’s working properly across different apps. If so, you can go for the premium plan.
Deck Up Your iPhone and iPad with New Fonts
So that was our quick article on how to install custom fonts on iOS 13 and iPadOS 13. With the new font management feature, users can easily install and manage their favorite fonts across Apple devices. Anyway, that is all from us. If you found our article helpful, then do comment down below and let us know.


0 Comments
Post a Comment